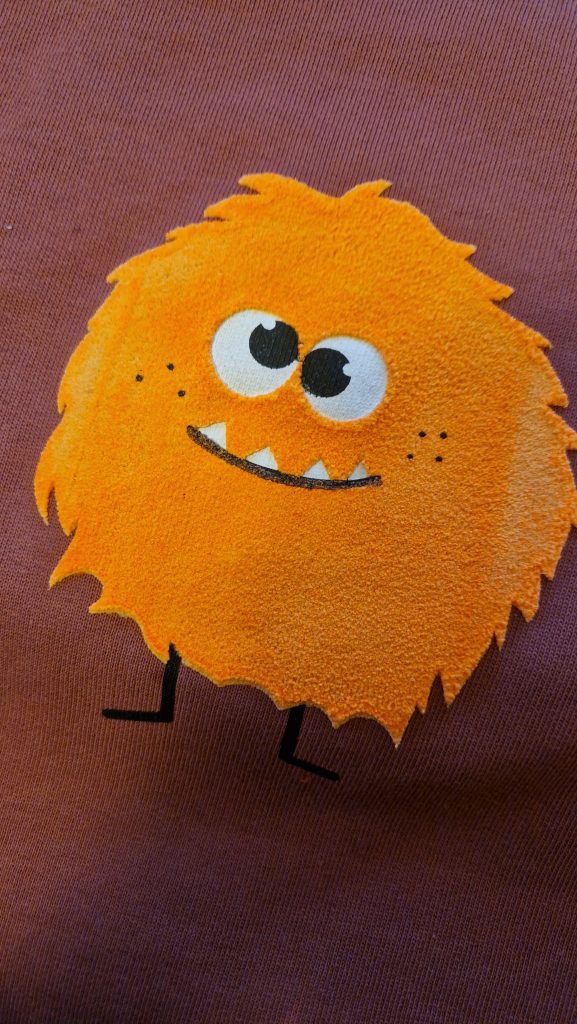
The monster parade includes 4 different monster, which can be found in my shop as a set or single.
The design is usable for any kind of colors, but has some nice details in case you want to try and effect-ink, such as 3D / puff-ink.
The design consists of 3 layers:
Eyes and teeth
Body
Face, arms and legs
There are two ways to print the eyes and teeth. You can either print them on top of body, meaning as layer 2, or as I did, as I wanted a stronger contrast to the 3D ink that I used:
When cutting the stencil, keep the cut out items, especially from eyes and teeth, as they are needed to „block“ the printing of the body layer.
The reason why I print the eyes before the body is that the body color is expected to be darker, and would cover up any overlaps (if relevant)
Check where you have placed the markers, so that you are not covering the legs with the tape
Furthermore, if you are using 3D/puff-ink, please note that
you need to use a squeege, which covers the full width of the design
pay attention to an even spread of color as 3D/puff-ink is not as forgiving, which becomes visible especially on larger designs)
Pay attention to printing on 3D ink edges, i.e. with the third black layer, as the color can bleed if placed across the edge (see picture below).
You can print on top of 3D ink – in one of my prints I used 3D neon ink, and added a layer of normal neon ink in the same color on top (that is the stronger neon example that you see in the picture).
Here I am placing the first stencil layer to print the eyes and teeth.
You can see the tape placed to align layers and the printed eyes and teeth
Before printing the next layer I am covering eyes and teeth with the cut out stencils
A small gadget can help with placing the stencil pieces, when your fingers are too big (like mine)
Align the second layer to markers, be careful not to move the cut out pieces
Remove the cut outs before printing the next layer. I used a pincer..
Print the 3rd and final layer. Here you can see how I had not payed enough attention to placing the tape.
It's a bit risky, but you can remove the tape and then re-reprint the area right away. Or wait till dry and use a black fabric marker later on.
In this example you can see how the uneven application of 3D ink looks pre-heating.
You can see that after puffing the uneven color applications stays
Hop over to Instagram, if you want to see a video of the print.
And drop me a line in case you have any questions!
Warenkorb
We use cookies on our website to give you the most relevant experience by remembering your preferences and repeat visits. By clicking “Accept All”, you consent to the use of ALL the cookies. However, you may visit "Cookie Settings" to provide a controlled consent.
This website uses cookies to improve your experience while you navigate through the website. Out of these, the cookies that are categorized as necessary are stored on your browser as they are essential for the working of basic functionalities of the website. We also use third-party cookies that help us analyze and understand how you use this website. These cookies will be stored in your browser only with your consent. You also have the option to opt-out of these cookies. But opting out of some of these cookies may affect your browsing experience.
Necessary cookies are absolutely essential for the website to function properly. These cookies ensure basic functionalities and security features of the website, anonymously.
Cookie
Dauer
Beschreibung
cookielawinfo-checkbox-analytics
11 months
This cookie is set by GDPR Cookie Consent plugin. The cookie is used to store the user consent for the cookies in the category "Analytics".
cookielawinfo-checkbox-functional
11 months
The cookie is set by GDPR cookie consent to record the user consent for the cookies in the category "Functional".
cookielawinfo-checkbox-necessary
11 months
This cookie is set by GDPR Cookie Consent plugin. The cookies is used to store the user consent for the cookies in the category "Necessary".
cookielawinfo-checkbox-others
11 months
This cookie is set by GDPR Cookie Consent plugin. The cookie is used to store the user consent for the cookies in the category "Other.
cookielawinfo-checkbox-performance
11 months
This cookie is set by GDPR Cookie Consent plugin. The cookie is used to store the user consent for the cookies in the category "Performance".
viewed_cookie_policy
11 months
The cookie is set by the GDPR Cookie Consent plugin and is used to store whether or not user has consented to the use of cookies. It does not store any personal data.
Functional cookies help to perform certain functionalities like sharing the content of the website on social media platforms, collect feedbacks, and other third-party features.
Performance cookies are used to understand and analyze the key performance indexes of the website which helps in delivering a better user experience for the visitors.
Analytical cookies are used to understand how visitors interact with the website. These cookies help provide information on metrics the number of visitors, bounce rate, traffic source, etc.
Advertisement cookies are used to provide visitors with relevant ads and marketing campaigns. These cookies track visitors across websites and collect information to provide customized ads.