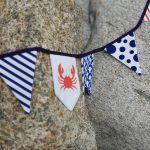
The pennant chain is a nice detail at many events or in your kids room. Inspired by the „mini-schultüten“ – I loved the idea of being able to customize theme and colors using the screenprint set. With a cutting machine the stencils are ready in no time – and with the seam allowance included and shown in the print it’s a quick and easy project. Have a look at the instructions. If you are curious about the materials and colors used, have a look below the instructions.
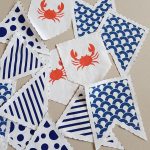
Print as many stencils as you need. Doing this please note that you need two pattern items per flag. I chose to print the same design on both sides; however as long as the format is the same, you can chose different colors, designs or even a different fabric on the back. [When using a different fabric, which you do not intend to print on, you can use a cut out printed flag as a pattern.]
The length of bias tape depends on the number of pennats you would like as well as the distance you like between each of them. Further, remember to keep some extra at the ends depending on how and where you want to attach the pennant chain.
The pennants final height of the pennants is is between 13.5 and 14 cm, depending on the used bias tape width. The size can be obviously be adjusted; however, please note that the updated size is intended for a seam allowance of 1cm, which you need to adjust accordingly. Further, please note that the designs have been tested for the chosen size – and may not all be possible to be printed smaller.
Further, please note that you can fit one stencil into an A5 screen, and two into an A4 screen. This comes in handy when you want to print two designs in the same colour (while you can obviously also tape it off :)).
Once you have printed and heat fixed your pennants, cut the pieces along the indicated seam allowance
As mentioned above, I have used two same designs to proceed
put two per pennant right on right
sew along the sides and bottom, leaving the top open
carefully cut the corners without touching the seam
all cut corners are shown here - remember the bottom middle of the two tip..
now turn your pennants (I ironed them at this point as well)
get your bias tape and measure whether you need to cut anything of the top of your pennant
(for the triangle the small corners need to go regardless of this)
arrange the order of your pennants and attach your bias tape, then sew.. (I did this for all flags in one go, before folding over (see next step).
fold over and sew again across the full length of the bias tape
Tadaa!!!
This is it 🙂 Hope you will have loads of fun with it!
In case you have any questions, please reach out via mail, the contact form or social media.
This section features affiliate links, meaning I will earn a small commission if you purchase through these links. These links are highlighted with a star „*“.
Fabric (I used an old table cloth with a rather sturdy fabric)
We use cookies on our website to give you the most relevant experience by remembering your preferences and repeat visits. By clicking “Accept All”, you consent to the use of ALL the cookies. However, you may visit "Cookie Settings" to provide a controlled consent.
This website uses cookies to improve your experience while you navigate through the website. Out of these, the cookies that are categorized as necessary are stored on your browser as they are essential for the working of basic functionalities of the website. We also use third-party cookies that help us analyze and understand how you use this website. These cookies will be stored in your browser only with your consent. You also have the option to opt-out of these cookies. But opting out of some of these cookies may affect your browsing experience.
Necessary cookies are absolutely essential for the website to function properly. These cookies ensure basic functionalities and security features of the website, anonymously.
Cookie
Dauer
Beschreibung
cookielawinfo-checkbox-analytics
11 months
This cookie is set by GDPR Cookie Consent plugin. The cookie is used to store the user consent for the cookies in the category "Analytics".
cookielawinfo-checkbox-functional
11 months
The cookie is set by GDPR cookie consent to record the user consent for the cookies in the category "Functional".
cookielawinfo-checkbox-necessary
11 months
This cookie is set by GDPR Cookie Consent plugin. The cookies is used to store the user consent for the cookies in the category "Necessary".
cookielawinfo-checkbox-others
11 months
This cookie is set by GDPR Cookie Consent plugin. The cookie is used to store the user consent for the cookies in the category "Other.
cookielawinfo-checkbox-performance
11 months
This cookie is set by GDPR Cookie Consent plugin. The cookie is used to store the user consent for the cookies in the category "Performance".
viewed_cookie_policy
11 months
The cookie is set by the GDPR Cookie Consent plugin and is used to store whether or not user has consented to the use of cookies. It does not store any personal data.
Functional cookies help to perform certain functionalities like sharing the content of the website on social media platforms, collect feedbacks, and other third-party features.
Performance cookies are used to understand and analyze the key performance indexes of the website which helps in delivering a better user experience for the visitors.
Analytical cookies are used to understand how visitors interact with the website. These cookies help provide information on metrics the number of visitors, bounce rate, traffic source, etc.
Advertisement cookies are used to provide visitors with relevant ads and marketing campaigns. These cookies track visitors across websites and collect information to provide customized ads.